
Ever wondered how to turn your startup idea into a functioning app without writing a single line of code?
📚 New to Lovable? Start with our comprehensive Lovable review to understand pricing, capabilities, and whether it's right for your project.
That is now possible due to AI code generators and app builders like Lovable.
In this post, we'll guide you through the process of creating an internal application for managing accelerator and incubator applications using this tool.
You're going to learn how to prompt, debug, integrate a backend, publish your app, and more.
Getting Started with Lovable: The Initial Prompt
The journey begins with the initial prompt on Lovable's homepage.
Instead of just writing what you need, we recommend providing a clear product requirements document (PRD) outlining your app's features and functionality. In our case, we're building an application tracker for accelerators and incubators.
This can be created through AI tools such as Grok or ChatGPT. It's important as it lays out exactly what you want in your app. Once you have produced this document, read through it to ensure it covers exactly what you want it to cover.
Here's what you need to know before entering your prompt:
- Initial errors are common and can often be fixed using AI assistance
- The platform generates mock data to help you visualize your app
- Some pages or features may be missing initially and require additional prompts
Step 1: Enter Your Initial Prompt
Start by entering your PRD into Lovable. For our accelerator application tracker, we included information about tracking application status, deadlines, and program details.
Step 2: Handle Initial Errors
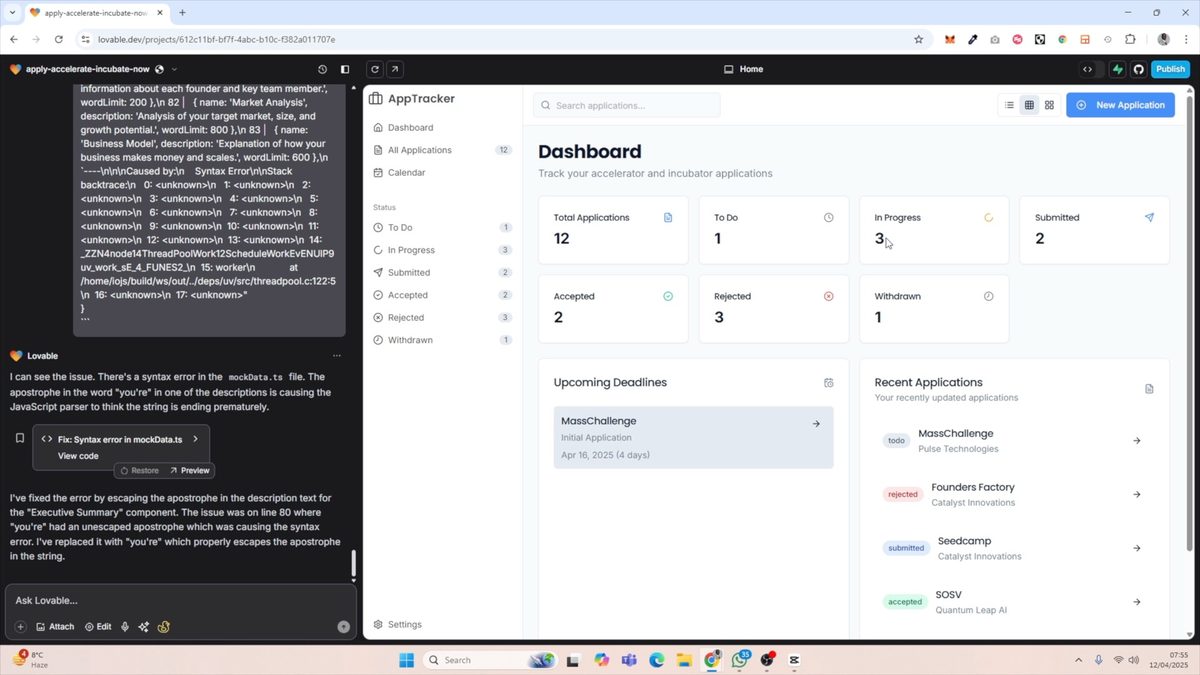
Don't be discouraged if you encounter errors at first. Lovable often provides an option to use AI to fix these issues. Simply click on the "Fix" button when prompted, and the platform will attempt to resolve the problem.
If this doesn't work, our tip is to take screenshots or copy the error message and paste this into the chat.
Step 3: Navigate the Generated Application
Once your app is generated, take some time to explore the different pages and features. In our case, we found a dashboard with mock data, application lists, and a calendar view for deadlines. However, we also noticed some missing pages, such as individual application details and the ability to create new applications.
Overall, Lovable created an impressive design and app structure.
Enhancing Your App with AI-Powered Features
One of the most exciting aspects of lovable app development is the ability to integrate AI capabilities. This can significantly enhance your app's functionality and user experience.
Step 4: Add AI Features to Your App
To add AI features, you'll need to provide Lovable with an example of what you want and your OpenAI API key. In our case, we added an AI-powered feature to help draft sections of the application, such as the executive summary.
Keep in mind that the AI output may require additional formatting within your app. You might need to instruct Lovable on how to render the AI-generated content properly.
Supabase Integration and User Authentication
To make your app more robust and secure, you'll want to integrate it with a backend service like Supabase. This allows for user authentication and data storage.
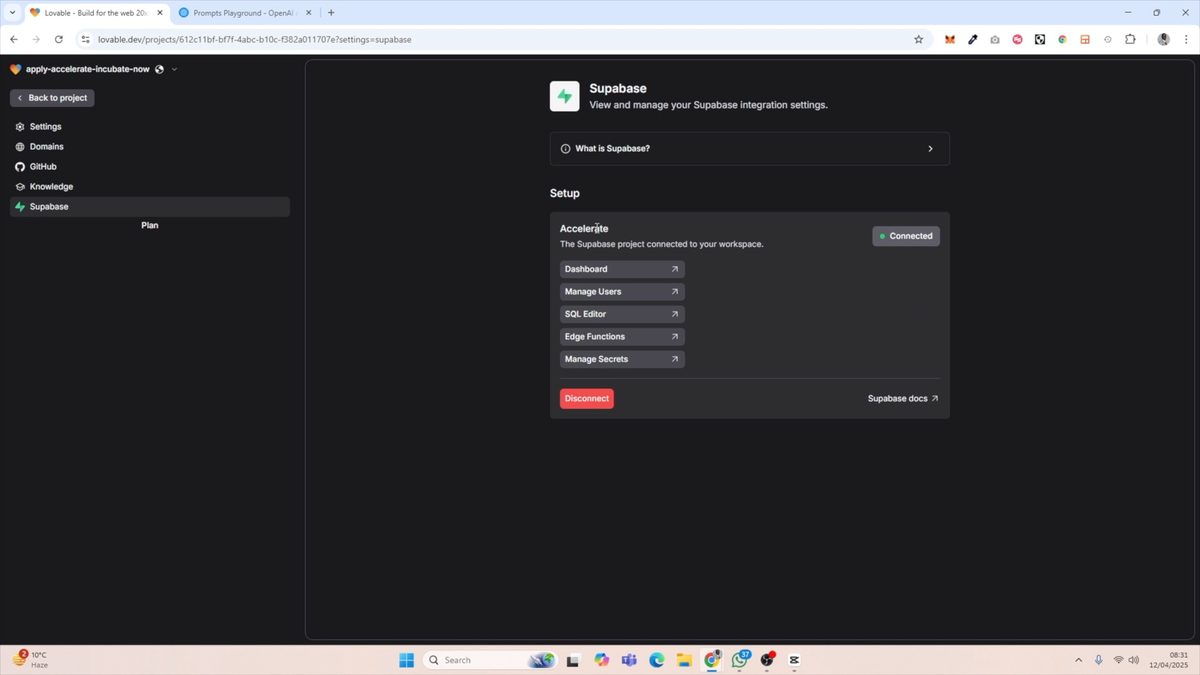
Step 5: Connect to Supabase
Click on "Manage Supabase" within Lovable and connect it to your project. Follow the instructions provided to enable user accounts and ensure all data is stored in Supabase.
Step 6: Implement Sign-In and Sign-Out Capabilities
Once connected, instruct Lovable to add sign-in and sign-out functionality to your app. This will create login and signup pages, allowing you to control access to your internal application.
Finalizing and Deploying Your Internal Application
With the core features in place and user authentication set up, it's time to review your app and prepare it for deployment.
Step 7: Review and Refine App Features
Go through each page of your app, testing functionality and identifying any remaining issues. Make note of any features that still need to be added or improved.
It's important to test all functions and pages to ensure that they're working and that they exist.
Step 8: Handle Errors and Token Capacity
Throughout the development process, you may encounter errors that use up token capacity. Be prepared to troubleshoot these issues and optimize your app to reduce token usage where possible.
Step 9: Choose Your Publishing Option
Lovable offers two main options for deploying your app:
- Self-hosting: Export the code and host it on your own servers
- Subdomain publishing: Use Lovable's servers with a custom subdomain
For quick deployment, the subdomain option is often the easiest choice. However, if you need more control over your hosting environment, self-hosting might be the way to go.
Here is our guide to deploying apps on Lovable:
Best Practices for Startup Accelerator Management Apps
Although you're probably using this guide to build an app for a different use case, knowing what features we might add to our app will help you brainstorm what you might want to add to yours.
When building an internal application for managing accelerator or incubator applications, consider including these key features:
- Application tracking with status updates (e.g., to-do, in progress, submitted, accepted, rejected)
- Deadline management with calendar integration
- User-friendly interfaces for internal teams to review and process applications
- Secure data storage and user authentication to protect sensitive information
- AI-powered assistance for application drafting and review
By following these steps and best practices, you can create a powerful internal application using lovable app development techniques. This no-code approach allows you to quickly iterate on your ideas and bring your vision to life without the need for extensive coding knowledge.
Want to learn more about Lovable? Watch our playlist here:
Ready to take your no-code skills to the next level? Sign up for No Code MBA and unlock a world of possibilities in app development, design, and more. Our comprehensive courses will equip you with the tools and knowledge you need to build amazing projects without writing a single line of code.
Frequently Asked Questions
What is Lovable app development?
Lovable app development refers to the process of creating applications using the Lovable platform, which is a no-code tool that allows users to build functional apps without writing traditional code.
Do I need coding experience to use Lovable?
No, you don't need coding experience to use Lovable. The platform is designed for users with little to no coding background, allowing them to create apps through intuitive interfaces and AI assistance.
Can I integrate AI features into my Lovable app?
Yes, Lovable allows you to integrate AI features into your app. You'll need to provide an OpenAI API key and specify the desired AI functionality within your app's requirements.
How does Supabase integration work with Lovable?
Supabase integration provides backend services for your Lovable app, including user authentication and data storage. You can connect Supabase to your Lovable project through the platform's interface.
What are the deployment options for a Lovable app?
Lovable offers two main deployment options: self-hosting, where you export the code and host it on your own servers, and subdomain publishing, where you use Lovable's servers with a custom subdomain.
Is Lovable suitable for building internal applications for startups?
Yes, Lovable is well-suited for building internal applications for startups, such as accelerator application management systems. It allows for quick development and iteration, which is ideal for startup environments.
Advertiser disclosure: some links on this website are affiliate links, meaning No Code MBA may make a commission if you click through and purchase.