Let's say you have just built an app or website using one of the best AI app builders — either Lovable or Bolt.
🔍 Want the full story? Check out our in-depth Lovable review with hands-on testing, pricing, and comparison to alternatives.
Now, you want to publish it so it's live on the internet.
This is where a lot of people get stuck. Hosting, URLs, and custom domains can be confusing.
In this guide, we'll walk you through the process of hosting and publishing your app or website on these popular AI builders. And we'll have a bonus tip that a lot of people miss.
Let's start with Lovable before moving on to Bolt.
How to Publish and Host AI-Built Websites with Lovable
Lovable offers a straightforward process for publishing your AI-generated websites. (New to Lovable? Start with our Lovable tutorial.) Let's break it down step by step:
Step 1: Access the Publish Feature
Once you've completed building in Lovable, navigate to the top of the editor and click on the "Publish" button. This action will present you with two options: publishing under a Lovable subdomain or connecting a custom domain.
Step 2: Publishing Under a Lovable Subdomain
For a quick and easy publishing process, choose the "Publish" option. This will host your website under a Lovable subdomain, making it instantly accessible on the web. The process typically takes about a minute to complete.
- Click "Publish" at the top of the editor
- Wait for the publishing process to complete (usually about a minute)
- Access your live website using the provided Lovable subdomain URL
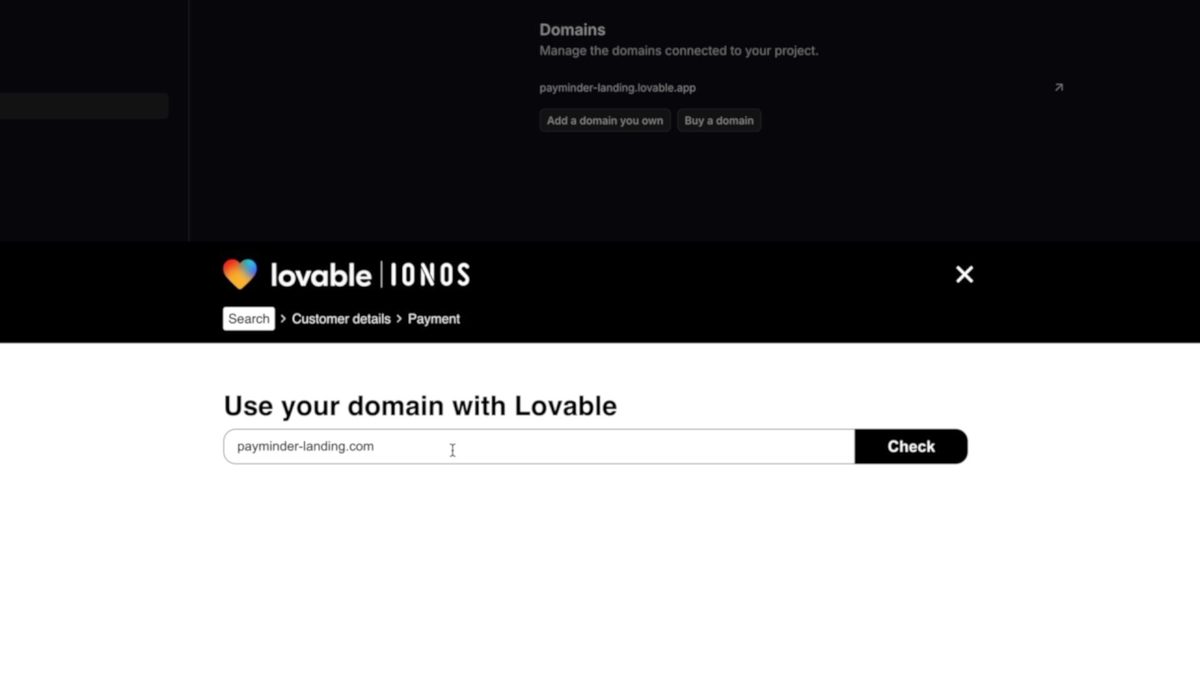
Step 3: Connecting a Custom Domain in Lovable
If you want to use your own domain name, Lovable offers two options:
- Add a domain you own:Connect an existing domain to your Lovable project
- Buy a domain through Lovable:Purchase a new domain directly through the platform
Both methods allow you to have a custom domain connected to your project without worrying about external hosting arrangements. Custom domains are available on paid plans — see Lovable pricing for details.
Step 4: Updating Your Lovable App/Website
After making changes to your app/website in the Lovable editor, simply click the "Update" button at the top to reflect these changes on the live website.
This ensures that your published site always displays the most recent version of your work.
Bolt Website Deployment and Netlify Hosting for AI Websites
📖 New to Bolt? Check our full Bolt AI guide before deploying.
Bolt takes a slightly different approach to publishing and hosting AI-built websites by integrating with Netlify. Here's how to deploy your Bolt-created website or app:
Step 1: Deploy Your Bolt-Built Website
Once you've finished creating your website or app in Bolt, click the "Deploy" button. This action will automatically deploy your application to Netlify, a popular hosting service for web projects.
Step 2: Access Your Deployed Site
After a successful deployment, Bolt will provide you with a link to view your live website. This link can be shared with anyone, allowing them to access your AI-built website or app on the internet.
Step 3: Claim Your Netlify Project
To gain more control over your deployed site, you'll want to claim your Netlify project:
- Click on the "claim URL" provided by Bolt
- If you don't have a Netlify account, create one
- Log in to your Netlify account
- Click "Claim app" to transfer the project to your account
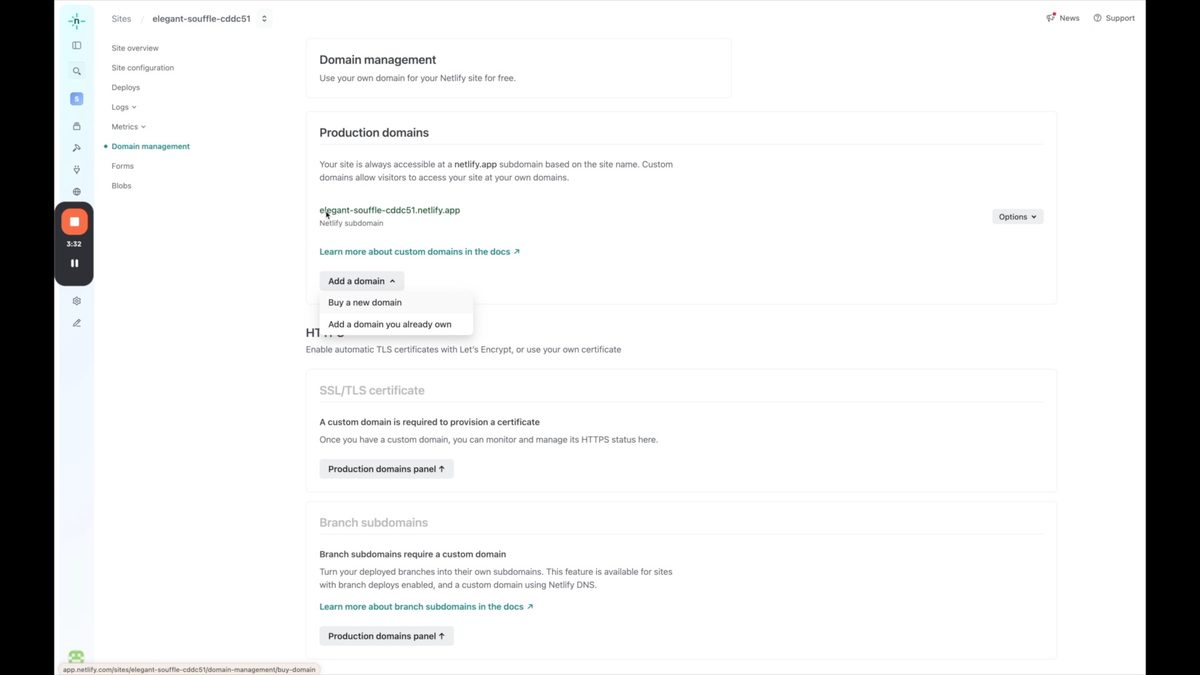
Step 4: Adding a Custom Domain on Netlify
Once you've claimed your Netlify project, you can add a custom domain:
- Go to "Site configuration" in your Netlify dashboard
- Navigate to "Domain management"
- Click "Add a domain"
- Choose to either buy a domain through Netlify or add a domain you already own (see Bolt pricing for what's included)
- Follow the provided instructions to complete the domain setup
Step 5: Redeploying AI-Built Apps After Making Changes
When you make updates to your site in Bolt, remember to click the "Deploy" button again to redeploy your application. This ensures that any changes you've made are reflected in the live version of your website or app.
Best Practices for Publishing AI-Generated Websites
To make the most of your AI-built websites, keep these best practices in mind:
- Regular updates and redeployment: Consistently update and redeploy your site to ensure it reflects your latest changes
- Choose between subdomain and custom domain: Decide whether a quick subdomain or a professional custom domain better suits your needs
- Scale your AI-built apps and websites: As your project grows with vibe coding, consider upgrading your hosting plan or exploring additional features offered by your chosen platform
- Monitor and maintain: Regularly check your published AI websites for performance issues and make necessary adjustments
By following these steps and best practices, you'll be well-equipped to publish and host your AI-built websites effectively. Whether you choose Lovable or Bolt, you now have the knowledge to take your AI-generated creations from the editor to the live web, accessible to anyone with an internet connection.
Watch a recent video where we compare Bolt and Lovable:
Ready to take your AI and no-code app building skills to the next level? Sign up for No Code MBA and access a wealth of courses and resources to help you build and launch your own AI-powered projects.
Frequently Asked Questions
What's the main difference between publishing with Lovable and Bolt?
Lovable offers direct publishing with its own subdomain option, while Bolt integrates with Netlify for hosting and deployment. Lovable's process is slightly more straightforward, while Bolt offers more advanced options through Netlify integration.
Do I need technical knowledge to publish my AI-built website?
No, both Lovable and Bolt are designed to be user-friendly and don't require extensive technical knowledge. However, familiarity with basic web concepts can be helpful, especially when setting up custom domains.
Can I use my own domain name with both Lovable and Bolt?
Yes, both platforms allow you to connect your own custom domain to your AI-built website. Lovable offers this directly, while with Bolt, you'll do this through Netlify after claiming your project.
How often should I update my AI-built website?
It's a good practice to update your website whenever you make significant changes or add new content. Both Lovable and Bolt make it easy to redeploy your site after making updates.
Is it necessary to claim my Netlify project when using Bolt?
While not strictly necessary, claiming your Netlify project when using Bolt gives you more control over your website, including the ability to add a custom domain and access additional Netlify features.
Advertiser disclosure: some links on this website are affiliate links, meaning No Code MBA may make a commission if you click through and purchase.