
In this comprehensive guide, we'll walk you through the process of setting up Stripe integration with Base44, allowing you to collect payments and monetize your app effectively.

Watch the video and read the article to learn how to do this step-by-step.
Integrating payment systems can be a complex task, but with the right guidance, you'll be able to set up Stripe in your Base44 app smoothly. Let's dive into the steps required to get your Stripe integration up and running.
Setting Up Stripe One-Time Payment in Base44
Before we begin, it's important to note that you'll need to be on Base44's $50 monthly plan to access the backend functionality required for Stripe integration. Here's how to get started:
Step 1: Enable Backend Functionality
- Go to your Base44 app settings
- Look for the "Backend Functionality" option
- Enable this feature to allow server-side functionality and API calls
Step 2: Initiate Stripe Integration
Once you've enabled backend functionality, you can start setting up Stripe:
- Open the Base44 chat interface
- Request to add Stripe functionality to your app
- Specify that you want to set up a one-time payment with a paywall to access content
Base44 will then guide you through the process of setting up the necessary API calls with Stripe.
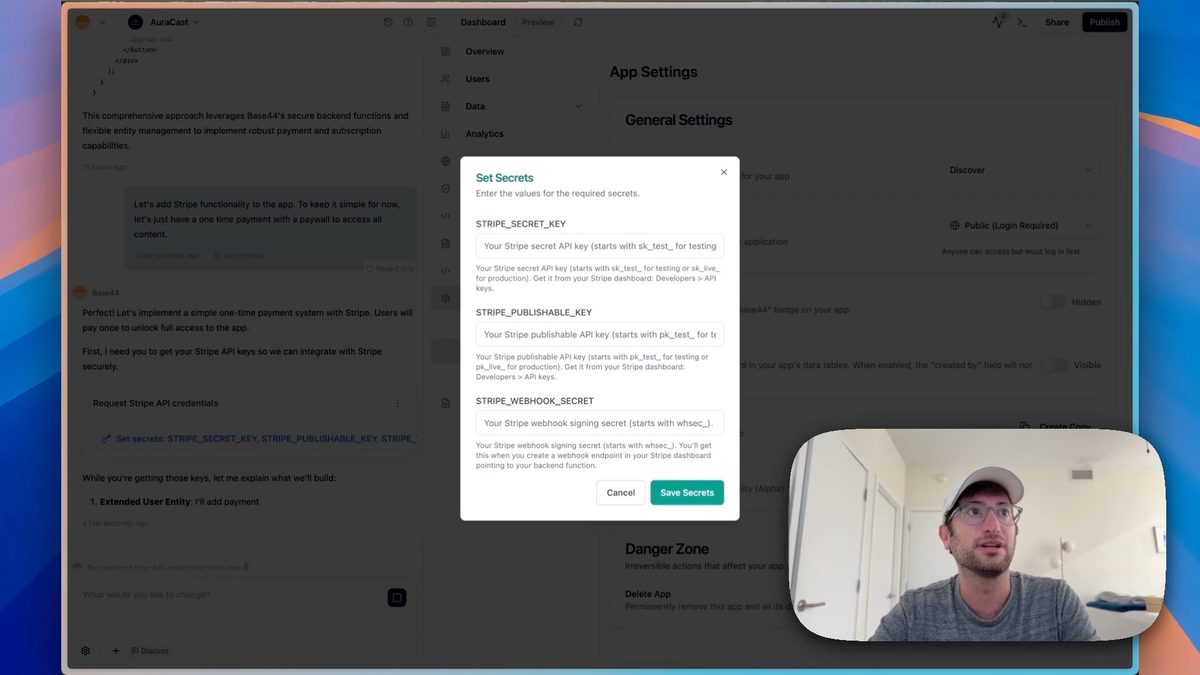
Configuring Stripe API Credentials and Sandbox Mode
To properly set up Stripe integration, you'll need to provide certain API credentials. Here's how to obtain and configure them:
Step 1: Access Your Stripe Dashboard
- Log into your Stripe account
- Switch to sandbox mode for testing purposes
Step 2: Locate API Keys
- In your Stripe dashboard, search for "API keys"
- Find your publishable key and secret key
Step 3: Set Up Webhook
- Search for "webhooks" in your Stripe dashboard
- Create a new webhook endpoint
- Use the URL provided by Base44 as the endpoint URL
- Select the "checkout.session.completed" event
- Reveal and copy the signing secret
Step 4: Enter Credentials in Base 44
- Paste your Stripe publishable key, secret key, and webhook secret into Base44
- Confirm the information to complete the setup
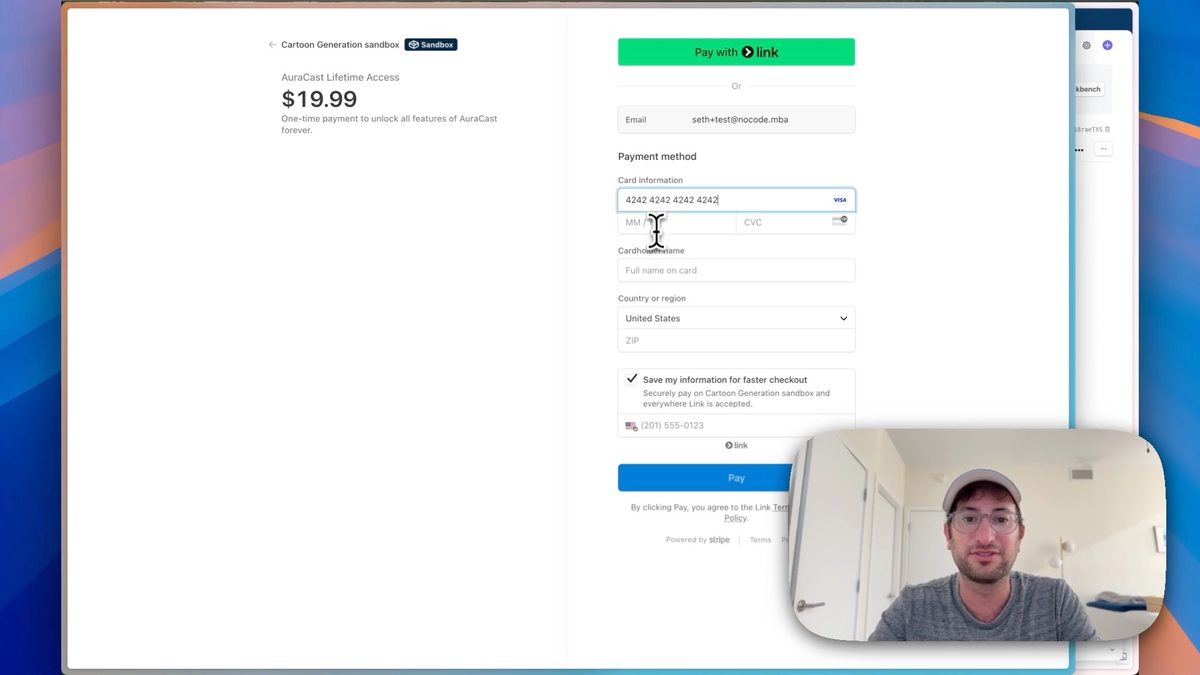
Implementing and Testing the Stripe Checkout Session
Now that you've set up the basic integration, it's time to implement and test the Stripe checkout process:
Step 1: Create a Paywall
Base44 will automatically create a paywall for your content. This typically includes an "Unlock Now" button that redirects users to the Stripe checkout page.
Step 2: Test the Payment Flow
- Open your app in a new tab (outside the app builder environment)
- Navigate to the paywalled content
- Click the "Unlock Now" button
- You should be redirected to a Stripe checkout page
Step 3: Simulate a Payment
- Use Stripe's test card number: 4242 4242 4242 4242
- Enter any future date for expiration
- Use any three-digit number for the CVC
- Enter a name and zip code
- Complete the payment
Step 4: Verify Success
- After payment, you should be redirected back to your app
- Check if you now have access to the previously locked content
Troubleshooting Stripe Integration with Base44
If you encounter issues during the integration process, don't worry. Here are some common problems and solutions:
Webhook Configuration Issues
If your app doesn't recognize successful payments, there might be a problem with the webhook configuration. In this case, you may need to update the user status based on the successful payment confirmation rather than relying solely on webhooks.
Testing Outside the App Builder
When testing Stripe integration, always do so in a separate tab outside the app builder environment. This helps avoid potential issues that may arise within the builder interface.
Error Messages and Payment Verification
Pay close attention to any error messages you receive during the integration process. These can provide valuable clues for troubleshooting. If you're having trouble verifying payments, double-check your API credentials and webhook configuration.
Future Considerations for Stripe Integration
While this guide focuses on setting up one-time payments, there's more you can do with Stripe integration in the future:
Setting Up Recurring Subscriptions
For more advanced monetization strategies, you might want to consider implementing recurring subscriptions. This will require additional webhook configuration to manage subscription lifecycles effectively.
Importance of Webhooks for Subscription Management
Webhooks are crucial for managing subscriptions as they allow your app to receive real-time updates about subscription status changes, renewals, and cancellations.
Integrating Stripe with your Base44 app opens up a world of possibilities for monetization. By following this guide, you should now have a functioning one-time payment system in place. Remember to thoroughly test your integration and stay updated with the latest Stripe and Base44 features to maximize your app's potential.
Watch the tutorial where we built this app here:
At No Code MBA, we're committed to helping you build powerful, revenue-generating apps without writing a single line of code. Ready to take your app development skills to the next level? Sign up for No Code MBA and access our comprehensive courses on no-code tools and app monetization strategies.
Frequently Asked Questions
What is Stripe integration, and why is it important for Base 44 apps?
Stripe integration allows you to process payments securely within your Base 44 app. It's important because it enables you to monetize your app by selling products, services, or access to content, thereby creating a revenue stream from your app.
Do I need any coding knowledge to integrate Stripe with Base 44?
No, you don't need coding knowledge to integrate Stripe with Base 44. The platform provides a user-friendly interface and guides you through the process. However, you should be familiar with basic app-building concepts and be comfortable following technical instructions.
Can I test Stripe payments without using real money?
Yes, Stripe provides a sandbox mode that allows you to test payments without using real money. You can use test card numbers provided by Stripe to simulate successful payments, declined cards, and other scenarios.
What should I do if the Stripe integration isn't working as expected?
If you're experiencing issues, first ensure that all your API credentials are correct. Check your webhook configuration and test outside the app builder environment. If problems persist, reach out to Base 44 support or consult Stripe's documentation for troubleshooting tips.
Can I use Stripe to set up recurring subscriptions in my Base 44 app?
While this guide focuses on one-time payments, it is possible to set up recurring subscriptions using Stripe in Base 44. However, this requires more advanced configuration, particularly with webhooks to manage the subscription lifecycle effectively.
Advertiser disclosure: some links on this website are affiliate links, meaning No Code MBA may make a commission if you click through and purchase.